
In this part of the guide, we will configure a new disk for Veeam Backup data using LVM. LVM offers significant advantages over traditional partitioning, enabling dynamic resizing of logical volumes without downtime. It allows combining multiple physical disks into volume groups for scalable logical volume creation. LVM simplifies storage allocation by abstracting the physical layout and enhances performance through striping and caching. LVM provides a powerful and flexible storage management system.
01 – Log on to the server using the administrative user. If this is your first access after installation, you will be required to change the password.

02 – Log in again using the administrative user and change the root password.
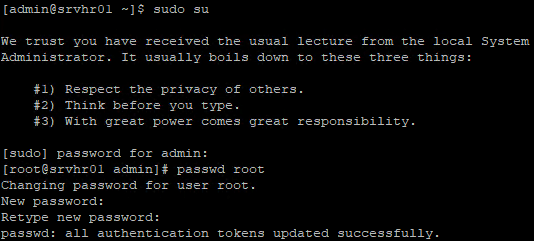
Root login is blocked by default via SSH. Validating root access to the server is very important.
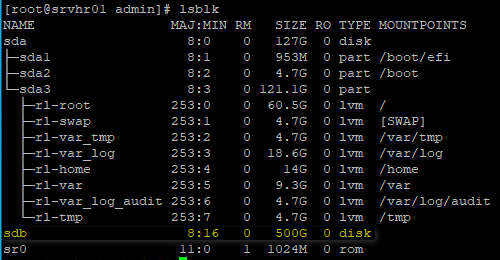
03 – Use the command lsblk to list all disks available on the server. For this guide, we will use disk /dev/sdb (500GB). (adapt this to your environment.)
04 – Create a Physical Volume (PV) on the disk that will be used for Veeam data.
pvcreate /dev/sdb

05 – Create a Volume Group (VG) on the disk that will be used for Veeam data.
vgcreate veeam_vg01 /dev/sdb

06 – Create a Logical Volume (LV) using all available space in the VG veeam_vg01.
lvcreate -l 100%FREE -n veeam_lv01 veeam_vg01

07 – Format a Logical Volume (LV) veeam_lv01 for the XFS filesystem.
mkfs.xfs -b size=4096 -m reflink=1,crc=1 /dev/veeam_vg01/veeam_lv01

08 – Create a new folder on /mnt and mount LV veeam_lv01
mkdir /mnt/vrepo_01
mount -o inode64 /dev/veeam_vg01/veeam_lv01 /mnt/repo_01

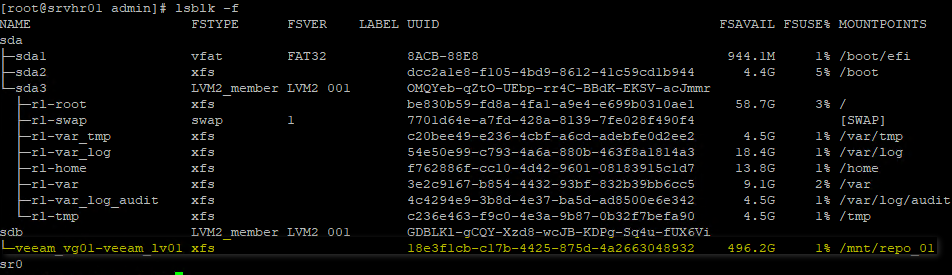
09 – Get the UUID from /dev/veeam_vg01/veeam_lv01.
blkid -f
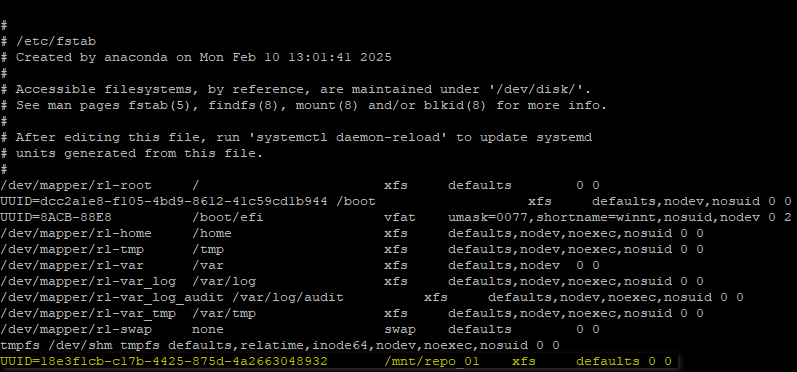
10 – Edit /etc/fstab and add the mount point configuration using the UUID.
vi /etc/fstab
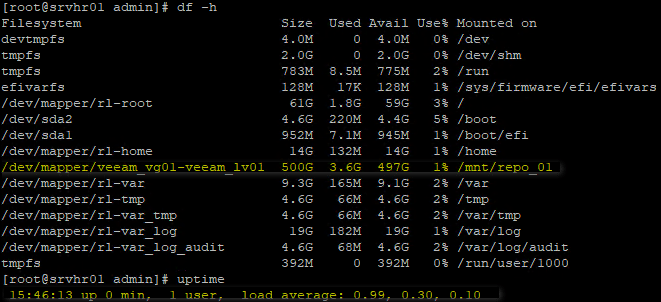
11 – Check if /mnt/repo_01 it’s automatic mounted after the server reboot.
df -h
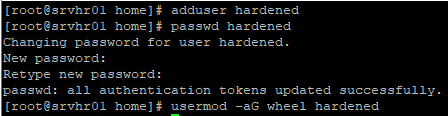
12 – Create a new user “hardened” to connect the Veeam Backup Server to the repository and initially add this user to the “wheel” group.
adduser hardened
passwd hardened
usermod -aG wheel hardened
After the connection between the Veeam Server and the Repository is established (which will be covered in Part 3), remove “root” permissions from this user
13 – Add permissions for the “hardened” user on /mnt/repo_01.
chown -R hardened:hardened /mnt/repo_01
chmod 700 /mnt/repo_01

14 – Edit the visudo file to add permissions for the “hardened” user to reboot or shut down the server after removing them from the “wheel” group.
visudo

15 – Install DNF for automatic security updates
yum install dnf-automatic -y

16 – Edit this file /etc/dnf/automatic.conf and adjust this lines upgrade_type to security and apply_updates = yes.
vi /etc/dnf/automatic.conf


17 – Enable and start the DNF automatic update services
systemctl enable dnf-automatic-download.timer
systemctl start dnf-automatic-download.timer
systemctl enable dnf-automatic-install.timer
systemctl start dnf-automatic-install.timer

18 – To minimize the server’s vulnerability to timing attacks, edit the file /etc/sysconfig/chronyd.
vi /etc/sysconfig/chronyd

19 – Restart the chronyd service

References:
DISA STIG On Rocky Linux 8 – Part 1 – Documentation
Preparing Red Hat Enterprise Linux Server as Hardened Repository – User Guide for Microsoft Hyper-V
Fast Clone – User Guide for Microsoft Hyper-V
On part 03, I will demonstrate how to connect Veeam Backup Server to Repository.
Keep in mind that this guide is intended to demonstrate Veeam features and processes. It is not recommended to deploy any repository within a Virtual Machine.
Thanks for your time!
😉
Step by Step – Veeam Hardened Repository with Rocky Linux and DISA STIG – Part 1
Step by Step – Veeam Hardened Repository with Rocky Linux and DISA STIG – Part 3
Step by Step – Veeam Hardened Repository with Rocky Linux and DISA STIG – Part 4
Step by Step – Veeam Hardened Repository with Rocky Linux and DISA STIG – Final

Leave a comment